I love to eat so I cook. I cook to preserve a lost art form. I cook to show the people that I love and care about how much they mean to me.
Sunday, October 29, 2006
Flat Leaf Parsley
I love parsley and decided to grow some from seed so that I would never have to purchase it again. Unfortunately, I decided to start growing an herb garden rather late in the season. In any case, I've learned a lot about growing parsley. Apparently, it is very difficult to grow parsley from seed but after some extensive research I decided to give it a try.
It helps to soak the seeds in warm water for 24 hours. I then planted the soaked seeds in 6 egg crates, that is 1 egg crate that holds 6 eggs. In each egg holder, I place a bit of soil, then generously sprinkled at least 8 seeds over the soil, and the lightly covered the seeds with a 1/4 inch of soil. Parsley likes to germinate in the dark. I then watered the soil, and hoped beyond hope that they would germinate. In week three, 3 of the 6 egg holders showed growth! In each of the 3 egg holders, exactly one seed had germinated. A little weird.
Once the seeds had germinated, they needed sun. So during the day, I would place the egg crates outside on chair where the parsley would get full sun. And at night, I brought them inside because they were too young and fragile to withstand the cool evenings. After a week or so, I noticed that they were no longer really growing so I decided to transplant them into larger containers yesterday. The picture depicts 1 of 2 parsley plants (I drowned the 3rd one!). I planted them in tofu containers in which I made drainage holes.
As you can tell, they are still rather small so I'm still bringing them in at night until they are much more developed. One of the parsley plants has just developed its third leaf which I find rather exciting!
Saturday, October 28, 2006
My Herb Garden
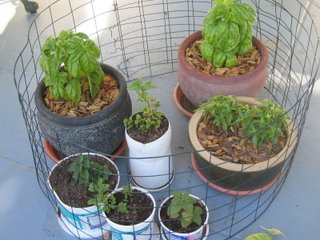
So about 2 months ago, a friend gave me a variety of little seedlings including basil, mini basil, oregano, marjoram, spearmint and catnip. She had started them from seed in paper egg crates (so clever I think!). Since I don't really have an yard, I repotted the seedlings in pots , and a variety of containers including yogurt, milk, and tofu in which I made drainage holes.
I love using fresh herbs but resent having to purchase a whole bunch of it only to use 1-2 tbsp and then toss the rest because I have no other use for it. It has been nice to go out and pick fresh basil for some of the Italian dishes I've made recently. The basil grew quickly and will most likely wither soon since they don't particularly like cold weather, not even the mild winters we have in California. So I'll have to harvest soon and make pesto.
I've really learned a lot about gardening since last summer when I failed to grow anything successfully. Last year, I tried to grow basil and other vegetables from seed but didn't have any success. I probably should have planted the seeds in really small containers as opposed to the gallon containers I used. Apparently growing seeds in large pots is a waste of soil, and causes rot because there's a lot of soil that isn't being put to use immediately.
A successful way to germinate seeds is to plant them in very small containers (like egg crates). Let the seeds germinate inside where it's nice and warm, sprout, and establish themselves. Then repot in containers that are size and height proportionate. You don't want to place a newly sprouted seedling into 1-gallon pot, more like a half pint container (think small cottage cheese container). As the seedlings grow and develop, you repot them in bigger containers. I think this is why I had some success this year, outside of my friend helping me out.
As you can see from the pictures above, I have a little fence around my pots. I have an unidentified critter that digs the soil of my basil and mini basil plants but leaves the plants in tact! Initially I thought it was a squirrel because I hear they love basil but none of the leaves were touched. Than I thought it was a cat. In any case, I moved them to a 2.5 foot high table thinking that would stop the critter, but it still attacked! Then I built the fence you see and attached it to the table. Still the critter came! I have no idea what it could be!
The critter took a two week hiatus and decided to attach my vulnerable flat leaf parsley plant this afternoon while I was out! I still have no idea what it is and wish I could capture it on camera.
Thursday, October 26, 2006
Spinach Tofu Ravioli
I know, these look a lot like the Green Dumplings! They are actually spinach tofu ravioli with a chili tomato sauce. We love ravioli and wanted to make a healthier version of what is served in restaurants or purchased at the grocery store. Taking a tip from my mom who makes fresh lasagna and substitutes the ricotta with tofu, we found this recipe. The amazing thing about my mom's recipe is that it just as tasty as if she had used ricotta minus all the fat and cholesterol.
The one thing we didn't really realize when we selected this recipe is that it has a Japanese bent, which is fine but why the recipe suggested a tomato sauce is beyond me. While the Japanese elements are minimal, they do really affect the flavoring and it was reminiscent of the Green Dumplings minus the sharp taste of green onions.
This takes quite a bit of effort with all of the steps -- I would guess about 90 minutes or so from start to finish. May be even longer since this was our first time making ravioli.
Next time, I would definitely use more Italian flavorings such as basil and oregano. While the taste was flavorful, I thought the tomatoes were an odd combination with the flavor of the ravioli though this might be my personal bias. I also dipped one of the ravioli in soy sauce like a dumpling and enjoyed that too! I personally thought it worked better with the soy sauce. My cooking buddy topped his with the chunky tomato sauce I made plus a bit of grated Parmesan. He liked it.
For the sauce, I did not use a tomato puree sauce. I used 1 can of diced tomatoes instead. I heated a bit of oil, threw in some dried red chili flakes, and then added the diced tomatoes. I have a preference for tomato chunks.
Makes 4 servings
Cooking Time: 90 minutes
Ingredients
- 2 large bunches of spinach, stemmed
- 2 tbsp white miso
- 1 tbsp lemon juice
- 1 lb. firm tofu, drained
- 2 tbsp olive oil
- 4 cloves garlic, minced
- 1 tbsp chopped fresh rosemary
- 70 wonton wrappers
- 1 1/2 cup tomato sauce, hot
- Salt and pepper to taste
Preparation
Wash spinach, shake excess water from leaves, cook in large uncovered pot on medium heat, stirring frequently, 8 minutes or until wilted. Transfer to colander and squeeze out excess liquid. Chop finely and set aside.
Combine miso, lemon juice, and mirin in a good size bowl. Add tofu and mash to form small curds.
Warm oil and garlic in large skillet over medium heat about 1 minute. Add tofu and 1/2 tsp salt and cook until almost dry, about 5 minutes. Add spinach and dry, about 1 minute. Stir in rosemary and pepper. Transfer to bowl and bring to room temperature.
Line large baking sheet with parchment or wax paper. Have a small bowl with water, pastry brush, and fork nearby.
Place wrapper on a work surface and brush 1/2 inch around the edges with water, placing a heaping teaspoon of filling in the middle of the wrapper. Fold wrapper in half, sealing with fork (I found this step a lot easier using your fingers). Place on a baking sheet. Repeat until filling is gone.
To cook: Bring 4 quarts of water to a boil in a large, wide pot. Add half of ravioli, they shouldn't be crowded. Cook until they look translucent around edges, about 3 minutes. Remove with a slotted spoon, shaking off excess water. Transfer to serving bowls and top with warm sauce.
Monday, October 23, 2006
Swiss Chard Risotto
This recipe is a little like the Italian Rice and Chard Soup I wrote about a few months except that it requires quite a bit of stirring and is much much creamier than the soup. This risotto tastes just amazing and is worth the effort it takes to make. They key is to cook everything slowly over medium heat so that the flavors really have time to fuse together.
Makes 4 servings
Cooking Time: 45 minutes
Ingredients
- 5 cups veggie or chicken broth
- 4 cups chopped Swiss chard leaves (about 1 bunch)
- 2 tbsp olive oil
- 1/2 cup dry white wine
- 1 medium onion, chopped
- 1/2 cup freshly grated Parmesan cheese + additional for topping
- 1 1/2 cup Arborio rice
Click here for the original preparation. While this method is less labor intensive, I understand that the results you get may not be as creamy. Below, I provide the method I used.
Preparation
While bringing broth to a simmer, coarsely chop chard. It doesn't have to be perfect because it will wilt as it cooks down. Chop the leaves away from the stems and discard. Once broth comes to a simmer, cover and keep warm. Heat oil in heavy large Dutch oven over medium heat. Add onion and saute until translucent, about 5 minutes. Add rice and chard and stir until chard begins to wilt, about 3 minutes. Add wine and simmer until absorbed, stirring occasionally, about 2 min (if you don't have wine, skip it). This is where I diverge in the method used.
Add 1 cup broth to risotto and stir continuously until broth is absorbed by risotto. If you pull at the risotto, you shouldn't see liquid running out (about 2-3 minutes). Add broth in half cup increments for about 20 minutes. Start tasting risotto to see if it's losing it's nuttiness. Once risotto is tender, stopping adding liquid and stir in cheese. Add pepper to taste. Don't add salt (the original recipe calls for salt -- I don't know why!). Between the broth and cheese you'll have more than enough.
Serve immediately and top with more cheese if desired.
Sunday, October 15, 2006
Low-Fat Favorite: Oven Fries
So last night, we were making Cajun catfish and warm green beans, and decided that we should also make oven fries. I had never made oven fries but I had earmarked this recipe in the Moosewood Restaurant Low-Fat Favorites and thought it would go well with our evening meal. This recipe is fairly easy to prepare but requires about 40-50 minutes of oven time. You can make these with Idaho potatoes. For a twist, I suggest sweet potatoes, which is what I did. The flavor is really quite nice and is a nice compliment of sweet and salty.
Makes 4-6 servings
Cooking Time: 15 minutes for prep, 40-50 oven time
Ingredients
- 2 lbs potatoes (or sweet potatoes)
- 1 tbsp olive oil
- 1 tbsp paprika
- 1 tsp ground cumin
salt to taste
Preparation
Preheat oven to 425 degrees.
Wash the potatoes well and peel (I didn't peel... too lazy). In a large bowl, stir together olive oiled, paprika, and cumin and set aside. Cut potatoes lengthwise into slices no thicker than 1/2 inch. Then cut through the stacked slices and make 1/2 inch-wide strips. Toss the potatoes in the oil and spices until well coated. Arrange potatoes in a single layer on a baking sheet prepared with cooking spray or lightly oiled. Bake for 45-60 minutes (for Idaho potatoes), stirring occasionally, until fries are golden and crisp. Sprinkle with salt and serve immediately.
If you using sweet potatoes, bake for 25 to 40 minutes.
Suggestions
I made the paste with 1 tbsp of olive and it was rather thick, so much so that I thought it would not coat the potatoes so I added another 1 tbsp of olive oil to thin it out. Also, at 40 minutes they were soft but not crispy so I left them in for another 10 minutes. It got them a tad more crispier but not really. Perhaps adding a bit more oil would make the crispier? I guess the trick is to not add so much oil they get greasy.
Over all, we loved this recipe and would make it again. No pictures -- we ate them before we could!
Warm Blueberry and Almond Muffins
I thought I had written about these before but I haven't! I love blueberry muffins and I resent that what you buy at the grocery store and sometimes even a good bakery sorely lacks blueberries! Have you ever eaten a muffin that only has 2 blueberries in it? How can this possibly be called a blueberry muffin. But I have now found a recipe that is chalk full of blueberries and other healthful ingredients but super tasty at the same time.
This recipe comes from easy vegetarian: simple recipes for brunch, lunch, and dinner. I love that it uses minimal butter and no oil whatsoever.
Makes 10 servings
Cooking Time: 15 minutes for prep, 18-20 minutes in the oven
Ingredients
1 3/4 c all-purpose flour
1 1/2 tsp baking powder
1 tsp apple pie spice
1/2 c ground almonds or 3/4 c slivered almonds, finely ground in a food processor
3/4 c sugar
1 egg
1 1/4 c buttermilk
4 tbsp butter, melted
8 oz. blueberries, about 2 cups
2 tbsp slivered almonds, chopped
12-cup muffin pan
Apple pie spice
What is apple pie spice? I didn't know but I googled it and found that apple pie is a combination of spices that you probably already have so don't go out of your way to get this "spice". If you put together 1/2 tsp cinnamon, 1/4 tsp nutmeg, 1/8 tsp allspice, and 1/8 tsp cardamom, you have apple pie spice.
Suggestions and mistakes
This recipe suggested grinding up 3/4 cup slivered almonds to make 1/2 cup ground almonds but when I did this, I found that I had more than 1/2 cup ground almonds so I would suggest starting with a 1/2 cup slivered almonds.
This supposedly makes 10 muffins but I found that I had batter for more than 12. In fact, it makes more than a typical muffin pan can hold.
Also, I would suggest baking these muffins on the top rack (not the middle rack like I did). As you can see from the pictures above, while my muffins were baked through after 20 minutes, they did not have the beautiful golden color you would hope.
Preparation
Sift flower, baking powder, an apple pie spice into a bowl and stir in the ground almonds and sugar. Put the egg, buttermilk, and melted butter in a second bowl and beat well. Stir into dry ingredients to make a smooth batter.
Fold in the blueberries, then spoon the mixture into 10 of the muffin cups in the muffin pan until each one is three-quarters full. Sprinkle with chopped almonds and bake in a preheated oven at 400 degrees for 18-20 minutes, until risen and golden. Remove from the oven and let cool on a wire rack. Serve warm.
I recently discovered the Wilton Ultra Bake 12 cup muffin pan which was reviewed by Cook's Illustrated (they're the America's Test Kitchen folks on PBS). I love that they review lots of kitchen items and often what they rate highly is not the most expensive item on the market. The Wilton Ultra Bake is one of those items. It's an amazing non-stick pan but they use a technology that is not Teflon so you don't have to worry about scratching, etc. I love that when you finish baking, you can pull the muffins right out (in the case of blueberry or other fruit muffins that have bursting action, you have to be a tad more careful but still wonderful results). No sticking, no tearing, and no need to oil, butter, or spray before hand! And at $7.99 at Target, it's a total bargain.