Thursday, September 30, 2010

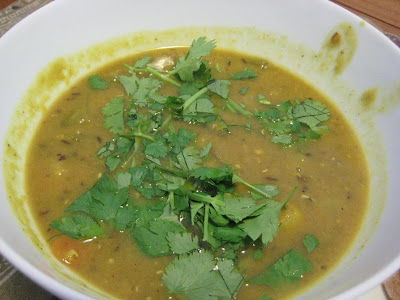
Lentil Sambar

I'm Indian and I don't cook a lot of Indian. My friends ask if I cook Indian and I bashfully say I don't. I don't know why. I know plenty of people from you name it ethnicity that don't prepare the foods they grew up with.

I love eating Indian food. I love eating my mom's Indian food the best. I don't know why but I had it in my mind that it takes a long time to prepare Indian food. And I'm sure it does if you prepare everything from scratch like all the curries and various powders. Perhaps this was reinforced by having a stay at home mom that prepared the most amazing Indian and non-Indian meals at home. She was in the kitchen a lot; happily, I think. As much as I love to cook, I don't want to be in the kitchen too much. I want to eat well without fuss.

In graduate school my mom gifted me the classic 1000 indian recipes cookbook. It's not fancy at all. It's not written by some famous Indian cook with stories about his/her childhood and what the dish means to them blah blah blah. It's no frills with some but not a lot of pictures. Mom chose it because she said it describes the cooking and preparation the way she does it so she figured it had to be good. Well, it is! Every single recipe I've tried has been a success. This is not to say that I think it's perfect. I have found cooking times and the number the dish serves to be off.

This book has sat on my bookshelf without much use until recently when I decided it's time to get into preparing Indian food again. I've been blown away about how little time some dishes take including this one, which was done in under 45 minutes with the vegetable prep. You just have to all the ingredients which you can get at your local Indian or Asian food store. Once you have the main ingredients you can whip up anything in very little time.

Thick and fiery sambars are the first course (in my case, the only course!) in any south Indian meal. They are served steaming hot with plain cooked rice and a vegetable accompaniment. Almost any vegetable can be used. The tamarind has a cooling effect and has the unique property of preserving the vitamins of the vegetables cooked in it! Did you know this?

Serves 4

Ingredients
- 1/2 cup red lentils
- 1 T oil
- 1/2 tsp fenugreek
- 1 tsp mustard seeds
- 1/2 tsp asafoetida
- 1 dried red chili, halved
- 2-3 curry leaves (I skipped because I didn't have these)
- 8 oz mixed vegetables (radish, onion, potato, carrots, bell pepper are great)
- 1 T tamarind pulp (you can make your own, it's easy, recipe below; or you can buy the pulp in a container. Mom says the pre-made pulp makes the food look black but will taste fine).
- 1 cup water
- 1 tbsp sambar powder
- 1/2 tsp turmeric
- salt to taste
- 1 tbsp fresh cilantro

Preparation
1. Cook the lentils in boiling water for about 1 hour until tender then drain. (Note, red lentils do not take 1 hour to become tender, try 20 minutes; first book error)

2. Heat the oil and fry the mustard, fenugreek and cumin seeds, asafoetida, red chili and curry leaves until the mustard seeds start crackling.

3. Add the green chilies and vegetables and fry for 2 minutes. Add the tamarind pulp, water, sambar powder, turmeric and salt. Cover and simmer for 2 minutes. Stir in lentils, cover and simmer for 10 minutes. Sprinkle with cilantro and serve hot with rice.

Note -- to test for 'spicey' level of sambar powder, lick finger and dip into powder; taste; the powder will taste raw for sure but this will indicate how hot the powder is, and hence how much you should add. I guarantee you will need less than 1 T. I multiplied this recipe by 4 which means I should have used 4 T sambar power. I used 2 T and it was still hot. The primary ingredient in sambar powder is ground dried red chilies if this indicates how fiery this dish can be. My sambar powder came straight from the aunties back in India.

Tamarind pulp
- 11 oz dried tamarind
- 2 1/2 c hot water

1. Soak dried tamarind overnight in the hot water or boil it for 15 minutes over medium heat.

2. Rub tamarind through the fingers to reduce it to a pulp then rub through a sieve and collect pulp. Discard husks. Excess pulp can be frozen.

Sunday, September 26, 2010

French Walnut Bread

This is a super easy, sinfully simple bread to make. It comes straight from Kneadlessly Simple. In fact, I'm not sure I did make it. The bread makes itself! All I did was mix flour, sugar, salt, yeast, water and walnuts. A day and half later, I had bread. Amazing.

This bread is earthy, nutty-tasting, and is great with butter, goat cheese, any cheese really. Half the flower is whole wheat. The crust is crisp but not as crisp as the crust in the Peasant Style Pot bread or Almost No Knead bread. And it did not get the beautiful round dome shape that other breads get. I performed all the requisite steps. In fact, it rose but not as much, and it came out a little flat. Not deflated but flat. I suspect the crispiness and dome eluded me because this recipe did not require the Dutch oven (or other pot) to be preheated in the oven.

Anyone else make this bread with the same result?

This bread makes great toast and goes well with curried carrot soup. Perfect for cooler fall weather and sharing with friends. Break bread with your friends. They'll love you even more than they already do.

This is my second Kneadlessly Simple recipe and I have to say that I still prefer the almost no knead bread. I think it has better flavor and crust, and if you can believe it, is easier to make and takes less time.

Yield: 1 large loaf, 12 to 14 slices

Ingredients
- 2 c whole wheat flour, plus extra as needed
- 2 c unbleached all-purpose white flour or white bread flour
- 1 tsp granulated sugar
- 2 tsp table salt
- 3/4 tsp instant yeast, fast-rising, or bread machine yeast
- 2 c ice water, plus more if needed
- Walnut oil or flavorless vegetable oil for coating dough top and baking pot
- 1 1/2 c fresh, fine-quality walnut halves

First Rise: In a large bowl, thoroughly stir together the whole wheat and white flour, sugar, salt, and yeast. Vigorously stir in the water, scraping down the bowl and mixing until the dough is well blended and smooth. If the mixture is too dry to incorporate all the flour, a bit at a time, stir in just enough more water to blend the ingredients; don't over-moisten, as the dough should be very stiff (it's stiff if you find it difficult to stir). Brush or spray the top with oil. Tightly cover the bowl with plastic wrap. If desired, for best flavor or for convenience, you can refrigerate the dough for 3 to 10 hours. Then let rise at cool room temperature for 12 to 18 hours.

Meanwhile, reserve 4 perfect walnut halves for garnish. Spread the remainder on a baking sheet and lightly toast, stirring several times, in a preheated oven for 325 degrees F for 10 to 15 minutes, or until fragrant and just lightly browned. Let cool. Chop finely (in a food processor, if desired).

Second Rise: Vigorously stir the cooled walnuts into the dough. Note: This was extremely challenging; the nuts were not spread uniformly throughout the dough. If it is not stiff, stir in enough more whole wheat flour to make it hard to stir. Using an oiled rubber spatula, lift and fold the dough in towards the center, working all the way around the bowl. Invert it into a well-oiled, then flour-dusted, 3-quart (or larger) heavy metal pot (or use a flat-bottomed round casserole with a lid). Brush or spray the top with oil, then smooth out the surace with an oiled rubber spatula or fingertips. Cut 1/2-inch-deep slashes to from an X in the center top; well-oiled kitchen shears work best. Put the 4 untoasted walnut halves in the angles of the X for garnish; press down very firmly to imbed them. Cover the pot with its lid.

Let Rise Using Any of These Methods: For a 1 1/2- to 2 1/2-hour regular rise, let stand at warm room temperature; for a 1- to 2-hour accelerated rise, let stand in a turned-off microwave along with 1 cup of boiling-hot water; or for an extended rise, refrigerate 4 to 24 hours, then set out at room temperature. Continue until the dough doubles from its deflated size.

Baking Preliminaries: 15 minutes before baking time, place a rack in the lower third of the oven; preheat to 400 degrees F. Lightly dust the dough top with whole wheat flour.

Baking: Bake on the lower rack, covered, for 45 minutes. Remove the lid and continue baking for 20 to 30 minutes, or until the top is well-browned and a skewer inserted in the thickest part comes out with just a few particles clinging to the bottom. Then bake for 5 to 10 minutes more to ensure the center is done (if the particles are moist then definitely bake longer). Cool in the pan on a wire rack for 10 minutes. Remove the loaf to the rack, running a knife around the edges to loosen if necessary (I used parchment instead of the oil and flour method -- this has typically not worked for me).

Serving and Storing: The loaf tastes and slices best at room temperature. Cool completely before storing airtight in plastic or foil. The bread will keep at room temperature for up to 3 days, and may be frozen, airtight, for up to 2 months.

Wednesday, September 22, 2010

Classic French Onion Soup

I'm not sure I can get through this post. This recipe took forever, really it did. Well, about 4 hours. We didn't eat dinner until after 9 PM, may be closer to 10, I can't remember. I was so tired, I had appetite suppression. Perhaps you know this feeling. You cook and cook and cook, and at the end you just don't want to eat. It was all a blur.

Hanging out with friends I hadn't seen in almost 6 months, we decided to cook up a storm. There were two birthdays to celebrate, one a newlywed, the other a parent for almost 2 years. Friends selected the recipes and kindly purchased all the ingredients for almost 5 dishes! All I brought was a frozen tiramisu since I was the out-of-towner with no kitchen or ingredients to prepare anything more exciting.

We had the whole day to prepare this soup but misreading the recipe through us for a loop. I thought the recipe would take about 60 minutes. NO NO NO NO! It was 60 minutes for STEP 2, and there are 5 steps! You got to love Cook's Illustrated. The soup was great, and devoured by all. Would I make it again? Probably not. It's a lot of fuss for a soup, and there are other soups I would much rather eat that don't take nearly as long. Nevertheless it was a lot of fun and I couldn't imagine spending a better way with friends and family.

Serves 6

Ingredients
Soup
- 3 T unsalted butter, cut into 3 pieces
- 4 lbs onions (about 6 large), halved pole to pole and sliced lengthwise 1/4 inch thick
- 2 c water, plus extra for deglazing
- 1/2 cup dry sherry
- 4 c low-sodium chicken broth
- 2 cup beef broth
- 6 sprigs fresh thyme, tied together with kitchen twine
- 1 bay leaf

Croutons
- 1 small baguette
- 8 ounces Gruyere cheese, shredded (about 2 cups)

1. FOR THE SOUP: Adjust an oven rack to the lower-middle position and heat the oven to 400 degrees. Generously spray the inside of a large (at least 7 quart) Dutch oven with vegetable oil spray. Add the butter, onions, and 1 tsp salt to the pot. Cook, covered, for 1 hour. (The onions will be most and slightly reduced in volume). Remove the pot from the oven and stir the onions, scraping the bottom and sides of the pot. Return the pot to the oven with the lid slightly ajar and continue to cook until the onions are very soft and golden brown, 1 1/2 to 1 3/4 hours longer, stirring the onions and scraping the bottom and sides after 1 hour.

Note: We used a metal stock pot and it was mostly fine. However, due to uneven heating, some of the onions burned onto the pan, and it was very very hard to remove. I think the enameled Dutch oven may work better for this reason.

2. Carefully remove pot from oven and place over medium-high heat. Cook the onions, stirring frequently and scraping the bottom and sides of the pot, until the liquid evaporates and the onions brown, 15 to 20 minutes, reducing the heat to medium if the onions are browning to quickly. Continue to cook, stirring frequently, until the pot bottom is coated with a dark crust, 6 to 8 minutes, adjusting the heat as necessary. (Scrape any browned bits that collect on the spoon back into the onions.) Stir in 1/4 cup water, scraping the pot bottom to loosen the crust, and cook until the water evaporates and the pot bottom has formed another dark crust, 6 to 8 minutes. Repeat the process of deglazing 2 or 3 more times, until the onions are very dark brown. Stir in the sherry and cook, stirring frequently, until the sherry evaporates, about 5 minutes.

3. Stir in 2 cups water, the chicken broth, beef broth, thyme, bay leaf, and 1/2 tsp salt, scraping up any final bits of browned crust on the bottom and sides of the pot. Increase the heat to high and bring to a simmer. Reduce the heat to low, cover, and simmer 30 minutes. Remove and discard thyme and bay leaf, then season with the salt and pepper to taste.

4. FOR THE CROUTONS: While the soup simmers, heat the oven to 400 degrees. Arrange the baguette slices in a single layer on a rimmed baking sheet and bake until dry, crisp and golden at the edges, about 10 minutes. Set aside.

5. Adjust an oven rack 6 inches from the broiler element and heat the broiler. Set individual broiler-safe crocks on the baking sheet and fill each with about 1 3/4 cups of the soup. Top each bowl with 1 or 2 baguette slices (do not overlap the slices) and sprinkle evenly with the Gruyere. Broil until the cheese is melted and bubbly around the edges, 3 to 5 minutes. Cool 5 minutes; serve.

Saturday, September 18, 2010

Curried Carrot Soup

My fridge was empty, very, very empty. I was not interested in my go to food, eggs. Too many of them had killed the taste for me. I was uninterested in running to the grocery store -- too crowded on Fridays; it takes the joy out of shopping when I have to fight through the maze of people to get produce.

What could I make? I had carrots, onions, broth, spices. Google saved the day again. Curried carrot soup. Amazing. Simple, easy, fast, AND tasty. Six ingredients total. Probably six ingredients you have on your shelf. Minimal prep, it's a win win.

I caution you on the curry. I used authentic curry straight from the Indian grocery store. It was spicy! Adding salt helps. A BIG dolop of Trader Joe's Whole Fat European Style Yogurt also helped. If you use curry powder from the regular grocery store, it's probably on the mild side and you will be fine.

This soup is great with grilled cheese or quesadillas or toasted french walnut bread.

Monday, September 13, 2010

Peasant Style Pot Bread

I checked out Kneadlessly Simple from the library. I had to wait several weeks because it is an extremely popular book and there were others waiting to get their hands on it too. I HIGHLY recommend the book. You'll want to make every recipe; these breads are enticing and you can practically smell the bread out of the book. I wish this book had a scratch 'n sniff feature. I've limited myself to making one loaf every week to ten days or so because otherwise I run around like a mad woman.

This recipe has a crispier crust than the Almost No Knead bread but I think the flavor of the Almost No Knead is better. Both have moist crumb and are definitely better than what you could buy at your local grocery store.

It's so easy I want to call these ridiculously simple recipes. You probably have all the ingredients in your kitchen. The beauty of these recipes is that you make them work to your schedule and not the other way around. There's time in the fridge which is any where from 3-10 hours. Then the rise at room temperature, any where from 12-18 hours or 18-24 hours; and then the second rise which can be done at either temp for 1.5 to 2.5 hours or the accelerated rise at 1-2 hours, or the extended rise of 4 hours in the fridge. It really works around your schedule, really it does.

My only modification would be to reduce the salt slightly. Some tasters found it slightly salty especially vs. the Almost No Knead Bread.

If you click on the title of this post the recipe is available on A Chow Life, a wonderful blog. She wrote the whole recipe out -- it's rather long -- so I would prefer not to rewrite it.

Tuesday, September 07, 2010

Tomato Curry Frittata

I know, it seems like all I blog about are eggs and bread. It seems to get boring but it doesn't. There are so many different ways to make eggs and it tastes different every time, really. My folks were visiting this weekend and they're kind of a tough crowd. Both like spicy food, deeming anything not spicey, blah. One is vegetarian +. By plus I mean low or no sugar, no fat, no egg yolks, no fruit, no this no that. At times I find these restrictions excruciating. I'm mostly vegetarian and know how to cook vegetarian very well but all these other complexities it makes me throw my hands in the air. Then I came to the grand conclusion that I would do my best. If they want to eat it, great and if not, then they're on their own. After all, my being mostly vegetarian (I eat seafood) doesn't stop my family from serving chicken when I visit. And I eat it, without complaint.

The inspiration for this dish came from my mom, who would use this filling to make omelets. The filling is extremely satisfying, exceptionally savory, and not overwhelmingly spicy. Rather than make individual omelets I decided to make a frittata so I wouldn't have to stand at the stove. It came out pretty well but the bottom burned a little. Not sure why since I made this a few weeks ago without the burning. Even with the burned bottom, it still tasted great. The mom was pleased with the results, and she's an exceptional cook.

Ingredients
- 2 T olive oil
- 6-12 eggs
- 1 1/2 pounds Roma tomatoes
- 1 medium or large onion
- 1 1/2 tsp cumin
- 1/2 tsp mustard seed
- 1/4 tsp chili powder
- chopped cilantro to taste
- 1/8 tsp asafoetida
-1/2 tsp

To make filling, see below. The filling can be made in advance and stored for 3 days in the fridge.

1. While heating 1-2 T olive oil in medium to large skillet over medium heat, roughly chop onion and tomato. Add mustard seeds, cover with lid until the popping sound subsides. Add asafoetida, cumin and chili powder. Let cook for 30 seconds to 1 minute, until fragrant.

2. Add onion and sautee until soft, about 7-10 minutes. Add chopped tomato. Simmer with lid on until tomatoes are really soft and skins come off, about 20 to 30 minutes (passive cooking). You don't really have to watch this too closely. Add salt to taste, approximately 1/2 tsp. Start with 1/4 tsp and increase in 1/4 tsp increments to find your appropriate salt level. If you like tomato chunks then you're done. My mom likes more of a puree so I mashed the tomatoes a bit. Add chopped cilantro to taste. Don't worry if the filling has kick. It will mellow out with the addition of eggs.

At this point you can use the puree to make either omelets or frittatas. For omelets, just beat 2-3 eggs (for 1 serving), add as much tomato filling as you like, beat some more, pour into heated skillet (kind of like an egg pancake), and then cook with a little oil. For omelets, I like having more filling to eggs so I may add as much as a 1/4 to 1/3 cup filling.

For frittata, read below.

3. Preheat oven to 350 degrees.

4. Place oil in 10-inch cast iron skillet, and turn heat to medium. While it's heating, beat together eggs, 2 cups tomato filling (1 cup for 5-6 egg frittata, 2 cups for 10-12 egg frittata), salt and pepper. When oil is hot, pour eggs into skillet and turn heat to medium low. Cook undisturbed for about 10 minutes, or until the bottom of the frittata is firm. FYI, I made a 10 egg omelet and it really filled up the 10-inch skillet.

5. Transfer the skillet to the oven. Bake for 20 minutes. Then check every 5-10 minutes or so, just until the top of the frittata is no longer runny. Garnish with more cilantro and serve hot or at room temperature. Total bake time is about 30 minutes.

Thursday, September 02, 2010

Best Quick Tomato Sauce

I've been feeling off for the last few months which mainly presents itself as lack of appetite and no cravings. I can go almost the whole day without feeling hunger. Not surprisingly, at the end of the day, pow, I'm starving. Those that know me well, know this is shocking. No appetite. No cravings. This is not a Nirmala they know. Needless to say, these days, when I crave something, I absolutely have to have it. For the past several weeks, I've had ice cream for lunch about 3 times a week. I indulge in high calorie treats without worry. I was slender to begin with; more slender now. I need the calories.

Last night, I wanted pasta with this quick tomato sauce. I don't know why. With all the tomatoes available, why would I make tomato sauce created from canned tomatoes?! Well, this tomato sauce is AMAZING. It's fresh, aromatic, buttery and simply divine. It's also low effort and done in about the time it takes to boil water and get the pasta cooked. It's perfect every time. Canned tomatoes offer consistency especially the Muir Glen and Tuttorosso brands. According to Cook's Illustrated, who created this recipe, these brands heat their tomatoes at lower temperatures to preserve the enzymes that can make a tomato taste fresh!

Anyway, last night the hunger really took over. In fact, I had to make everything in this recipe twice though I've made this recipe several times. First, I decided to try using crushed fire roasted tomatoes. BIG mistake. The smokey taste overwhelmed the whole dish. You know when you crave something you crave it exactly how you imagine it. This smokey version was not even close to what I imagined. It was the horrible very distant relative. I tossed it. I rarely toss food. I despise food waste. Then I over salted the pasta water; the pasta had to be tossed too. An hour later, everything was perfect. I dove right in and relished every single scrumptious bite, the sauce cascading into the little conch shells. It was magnificent. I had this for brunch today. I recommend this recipe regardless of whether tomatoes are in season.

My only comment about this recipe is that it says that the recipe makes about 3 cups of sauce, enough for 1 lb of pasta. I find that it's really only good for about 1/2 pound. My preference is more sauce than pasta so depending on your taste, you'll figure out what you need.

Time: 20 minutes

Ingredients
- 2 T unsalted butter
- 1/4 grated onion (using large holes on box grater -- be prepared for eye watering experience)
- 1/4 tsp dried oregano
- 2 medium garlic cloves, minced or pressed
- 1 (28 ounce) can crushed tomatoes (I couldn't find crushed; I used diced then pureed in food processor; hand held blender would work well too)
- 1/4 tsp sugar
- 2 T coarsely chopped fresh basil leaves
- 1 T extra virgin olive oil

Preparation
1. Heat butter in medium saucepan over medium heat until melted. Add onion, oregano, and 1/2 tsp salt; cook, stirring occasionally, until liquid has evaporated and onion is golden brown, about 5 minutes.

2. Add garlic and cook until fragrant, about 30 seconds. Stir in tomatoes and sugar; increase heat to high and bring to simmer. Lower heat to medium-low and simmer until thickened slightly, about 10 minutes. Off heat, stir in basil and oil; season with salt and pepper. Serve.

Don't forget the Parmesan on top!