Now tostadas are simply terrific because they can be made in 15 minutes or less and they are so tasty. The mixture of crispy crunchy tostada with beans, cheese, and other condiments is delightful, like a taco only better because your shell is less likely to split in half and dump everything on to the plate below. After a long day at work, I prepared and ate these a lot. The most basic recipe calls for ingredients that you're likely to just have around in the back of some cabinet or can be purchased ready to go with so very little preparation.
Serves 2
Time: 15 minutes
Ingredients
-Tostadas
-A can of your favorite beans
-Baby spinach, chopped
-A juicy tomato (skip if not in season)
-A bit of grated cheese
-Fresh salsa
-Sour cream (optional)
-Avocado (optional)
If I'm super busy or just plain lazy, I use low-fat refried beans that are spiced with green chilies (7 g of fiber per 1/2 c serving) this way I don't have to use any brain cells thinking about what spices to add to my beans. If I'm feeling a bit more creative than I'll use pinto or black beans, add a bit of cumin, chili powder, etc. or dump some salsa into them while heating them up or nothing at all because I think they taste good as is.
I prefer spinach over lettuce because it has much more nutritional value such as beta-carotene and lutein, and quercetin which has antioxidant properties. It's also rich in vitamins and minerals such as folate, vitamin K, and magnesium. Cooking spinach makes it easier for our bodies to absorb. For tostadas, do not cook the spinach. Have you ever noticed that in the days and week after eating green vegetables, your skin looks better? It's because of all their great properties.
Preparation
Heat toaster oven to 350 degrees and bake tostadas until you hear them sizzle a bit. In microwave or stove top, heat beans. Chop up spinach, tomatoes, and grate cheese. Layer tostada with beans, cheese, spinach, tomatoes, and salsa.
Now how easy is that?
If you want a little fancier preparation (aka you have more time), saute some frozen green peppers, and fresh mushrooms and onions together in a bit of olive oil. Add small amount to top of bean layer.
Friday, April 28, 2006
Thursday, April 27, 2006
Where are the Pictures?
Folks have been wondering if I stopped with the pictures. I have not but the camera is still down and out for the count. I'm a bit concered because the memory card functions in the memory card reader but not in the camera which may mean the camera is broken?! I don't know. I would be really upset if that were the case. On Sunday, I'm meeting up with my cooking buddy's sister who has the same camera so I hope to get to the bottom of this problem. Let's just hope that it is the memory card and not the camera!
I miss taking pictures especially since I've had such success in the kitchen. Isn't funny how that happens?
I miss taking pictures especially since I've had such success in the kitchen. Isn't funny how that happens?
Wednesday, April 26, 2006
Rant of the Week: Haig's Middle Eastern Specialty Foods
I love hummus and baba ghannouge but it's sometimes hard to find quality brands, even in the Bay Area. I thought I found a good one a few weeks back when I purchased Raquel's Middle Eastern All-Natural Baba Ghannouj. It met my requirement of having natural ingredients I could read but it really wasn't anything special. In fact, it had a funny taste. Perhaps because they added olive oil to their recipe? In any case, it's not a product I would purchase again or recommend. And stay away from the Athenos brand... they use high fructose corn syrup.
In any case, my cooking buddy introduced me to Haig's Delicacies. Among his many talents, he just has a knack for finding great snacks. Haig's is amazing. Their products not only taste so fresh but they also are cholesterol free and have no added oil!! I have tried their Baba Ghannouge and Hummus with Fire Roasted Red Peppers and they are deliciosa. On a good week, we can make them last 3-4 days but on bad day or if the A's aren't doing so well, it can be gone in a sitting. The flavor is just right -- not one ingredient is too strong -- it melds perfectly in the mouth. These products taste good with everything -- tortilla chips, carrots, and crackers. I've been known to just dip a spoon in. I would definitely consider using it as a sandwich spread in place of mayo (though I do like mayo).
I believe Haig's is currently only available in the Bay Area. If you know of any good middle eastern and Mediterranean products do let me know.
Monday, April 24, 2006
Corn bread
Growing up, my mom made corn bread from scratch. She used real corn in her recipe and there would be little chunks of kernels. The bread was amazing -- so moist, tender, and golden. It didn't need butter but of course I would put on a pat. The bread would fall apart before it made it into my mouth. It was delicious and it was not like anything I tasted before.
Since then I've been on the quest for a corn bread recipe and about a year and half ago, I found one on cakerecipe.com. I've made this recipe a dozen times if not more all with various degrees of success. It's always been good but some times it's 'pretty' good and at others, 'really' good. Last night, it hit the all time high of 'amazing.'
This bread is good for breakfast and dessert, and as an afternoon snack. It's a bit on the crumbly side but I'm not sure how to reduce this. I was reading that adding another egg may help? This recipe is so good and so effortless. It's not as good as the way my mom makes it but for an effortless recipe it's great.
Serves 12
Total time: 35 minutes
Ingredients
-1 c all purpose flour
-1 c corn meal
-2/3 sugar
-1 tsp salt
-3.5 tsp baking powder
-1 egg
-1 c milk
-1/3 c vegetable oil
My suggestions and modifications
I use 1 cup of brown rice flour. As I mentioned earlier, this came out amazing last night. It was beautifully golden and rose so nicely that it filled out the entire pan. I thought about what I did last night differently and the only thing that came to my mind was that I was sure to add the salt. I generally leave it out but it actually really enhances the flavor. I also was using a fresh container of baking powder which is why I think it rose as nicely as it did. In the past, I have generally only put in the 3 tsp baking powder but added the extra 1/2 tsp the recipe suggests.
Preparation
Preheat oven to 400 degrees F. Lightly grease a 9-inch round cake pan. In a large bowl, combine flour, cornmeal, sugar, salt and baking powder. Stir in egg, milk and oil until well combined. Pour batter into pan. Bake in preheated oven for 20-25 minutes, or until a toothpick inserted into the center of the loaf comes out clean.
Sunday, April 23, 2006
Chili Burgers
As a pescatarian, I do miss meat. I especially miss hamburgers, salami, and bacon, not often, but when I see an In 'N Out, I get a little pouty. Going through the Moosewood Low-Fat Favorites Cookbook last night, I decided to give the chili burgers ago for the second time but substituting kidney beans with pinto.
If you're craving meat, it's texture, juices and fat, this is probably not the recipe for you. It's full of protein, flavor, and so tasty but it does not resemble or taste like meat in any way whatsoever. The recipe claims to be crispy on the outside and juicy on the inside. It does get crispy but not juicy! So those are the warnings.
This recipe caught my eye because I am constantly hungry and I'm always on the look out for good sources of low-fat protein. According to this recipe, "beans and oats together create a perfect protein." I don't know how or why but I was really full after eating this meal.
Serves 6
Total time: 45 minutes
Ingredients
-1 c chopped onions
-4 garlic cloves, minced
-2 tsp olive oil
-1/2 c peeled and grated carrots
-1 1/2 tsp chili powder
-1 tsp ground cumin
-3 c cooked pinto or kidney beans (two 15 oz. cans with salt, drained)
-2 tbsp Dijon mustard
-2 tbsp soy sauce
-2 tbsp ketchup or 1 tbsp tomato paste
-1 1/2 c rolled oats
-salt and ground pepper to taste
My suggestions
The first time I made this recipe, I used kidney beans because that's what I happened to have. I followed the recipe and drained them of the 'sludge.' I found that this did not suffice and the overall bean mixture was a bit on the soupy side. The burgers came out fine but because of the soupiness the burger size was on the smaller side. This time, I rinsed the beans with water and drained and the texture was much more firm and I could make bigger burgers. I like this recipe with the kidney beans but I enjoyed it better with pinto beans. Because of their mild flavor, I think they take to the spices better.
Preparation
First, rinse and drain beans. Set aside. Saute onions and garlic in the oil for about 5 minutes until the onions begin to soften. Add the carrots, chili powder, and cumin and cook on low heat for 5 minutes. Set aside.
Mash the beans in a large bowl with a potato masher. Add the mustard, soy sauce, ketchup/tomato paste (I used ketchup), and sauteed onion mixture. Mix in the oats. Add salt and pepper to taste.
Moisten your hands and form the burger mixture into six 3 to 4-inch patties. Lightly spray or oil a non-stick skillet and cook the burgers on medium-low heat for 5 to 8 minutes on each side. To save time, use 2 skillets to cook burgers at once.
The first time, I used soft dinner rolls and made typical burgers with lettuce, tomatoes, etc. This time, I skipped the bread and served them on a bed of baby spinach leaves, sliced tomatoes, and salsa. They were mm mm good.
Saturday, April 22, 2006
Caribbean Stew
I had another fabulous meal last night! I've never cooked Caribbean food but I love it. Caribbean food is full of flavor and I love that a lot of dishes call for allspice. This recipe had caught my eye before but I was previously turned off by the 1 hour cooking time and the chopping of vegetables. But my cooking buddy was in charge of the evening meal, so I was able to kick back, observe, and help out on an as needed basis. This recipe comes from the Moosewood Restaurant Low-Fat Favorites Cookbook which is so great because it has recipes from all over the world!
This recipe introduced me to kale. I've heard and seen kale but have never prepared it or eaten it, knowingly that is. I have since learned that kale is a form of cabbage. It is a good source of vitamin C, and is rich in beta-carotene and phytochemicals such as indoles and sulforaphane. Kale is available year round but its seasonal peak is between January and April. Apparently we got it just in time!
Serves 4
Time: 1 hour
Ingredients
-1 large onion, chopped (about 2 cups)
-1/2 tsp salt
-2 tsp vegetable oil
-1/2 tsp dried thyme
-1/2 tsp ground allspice
-1 minced fresh chile, seeds removed for a milder 'hot'
-1 large sweet potato, cut into medium chunks (about 2 cups)
-2 c water or vegetable stock
-2 small zucchini, cut into 1-inch chunks (about 2 cups)
-1 1/2 c undrained canned tomatoes, coarsely chopped
-4 c loosely packed shredded kale
-1 tbsp fresh lemon or lime juice
-2 to 4 tbsp finely chopped fresh cilantro
-salt to taste
My cooking buddy used water not vegetable broth. With regard to the zucchini, I was instructed to cut the zucchini in half length wise, and each half into half again. I chopped these into 1/2 inch chunks. In previous cooking experiences we found that large chunks of zucchini don't do very well. We forgot the cilantro so we skipped it.
Preparation
Sprinkle onions with the salt. In a covered pot, saute the onions in the oil for 7 minutes, stirring occasionally. My cooking buddy tossed the onions into the pot and then sprinkled them with salt (it's easier this way). Add thyme, allspice, and chile and continue to cook for another minute or two. Stir in sweet potatoes and the water/stock and simmer, covered, for about 5 minutes. Add the zucchini and the tomatoes with their juice and simmer 10 to 15 minutes more, until all of the vegetables are barely tender. Add the kale and cook another 5 to 10 minutes. Stir in the lemon or lime juice, cilantro, and salt to taste.
Serve with brown rice and jerk tofu. The jerk tofu was amazing but as it is the most high maintenance dish to make that I'm not going to write about it unless I get requests to do so.
I had this dish for dinner this evening and I'm still thinking about it 5 hours later.
Have fun!
Friday, April 21, 2006
Portabella Mushroom Burgers
Tonight's meal was just amazing for so many reasons: 1) I didn't cook the meal; 2) it was fun, creative, and spontaneous; 3) the meal was so tasty yet so simple; 4) it got the taste buds going.... think fireworks, and 4) the meal taught me about pairing foods that I would not have otherwise thought to put together in the first place!
My cooking buddy thought of this while he was at work. He was searching through recipes online and nothing was catching his eye. He's a creative person that works best without recipes and cookbooks. This is a quality I lack being a bit on the structured side but I just love, admire, and appreciate that much more in my partner.
I would have never thought to put Brie or any other cheese on a mushroom... never. I love mushrooms and cheese but not together. The thought actually makes my stomach turn a bit especially if using some sort of American made cheese that solidifies when cooling. Ugh. But when he said Brie I was super excited.
Makes 4 Servings
Time: 25 minutes
Ingredients
-4 portabella mushrooms
-some basil, chopped finely
-2-3 cloves of garlic, minced
-2-3 tbsp olive oil
-freshly ground pepper
-Brie
-Dijon mustard
-1 onion, sliced such that it makes O-rings
-1 tomato
-Baby spinach
-Loaf of ciabatta bread
Preparation
Have the Brie out so that it comes to room temperature.
In a bowl, whisk together olive oil, garlic, and basil. De-stem mushrooms and rinse them. Drizzle olive oil mixture on gill side of mushroom (side that the stem was on). This is also something new for me.... I generally marinate the entire mushroom but you use much more olive oil and it gets sort of greasy. One side is enough. Set oven to 'broil', and cook mushrooms and onions for 8 minutes or so. This is bit of a guess based on previous experiences. My cooking buddy did this on a grill and it took longer. You'll know when the mushrooms are done....stick a knife through it and will be super tender and may even look a little watery. The onions will be soft and golden.
While this is going on, slice the loaf ciabatta bread such that they become buns. My suggestion is to cut the loaf into 4 mini loaves and then slice length wise. Toast the bread. Slice some tomatoes and chop a little more basil but not too much more.
Putting together
On one slice of ciabatta, place mushroom. On top of mushroom, spread Brie to taste. On top of this, onions, a little basil, a tomato slice or two, and then a little spinach. On other slice of bread, squirt some Dijon mustard. Squish together slightly and then eat.
You're in for a treat. I so wish I had a picture of this, it's beautiful, but alas the camera is still down!
Wednesday, April 19, 2006
Food Rant of the Week: Amy's Frozen Lunches and Meals
When I was working, I tried really hard to bring a homemade lunch to work every day but one day I just threw my hands up and said, "Forget about it." It was eating into my personal fun time, eating up precious mental space, and quite frankly stressful. So I was walking through the tentatively walking through the frozen food aisle at Whole Foods last year, when I noticed Amy's frozen lunches and meals. They stood out to me because some of them are made specifically for folks with wheat and gluten allergies and this is truly a rarity among frozen foods and meals. So I half-heartedly picked up a few, like Rice Mac & Cheese (made with rice flour but also available with 'regular' wheat based noodles) and Garden Vegetable Lasagna (also available in wheat and wheat-free forms). I tried them out and they were great! I couldn't believe it.
So the next week, I picked up more and noticed that Amy's frozen meal choices were increasing weekly like bunnies in the Spring time....I picked up a few vegetable and tofu rice bowls and some Indian meals. Anyone who knows me, knows that I am highly skeptical of anything Indian that is not made at home (or my 4 favorite Indian restaurants) but I gave it a go and was pleasantly surprised at how good they are.
These are my favorites (not in any particular order):
-Indian Mattar Tofu
-Indian Mattar Paneer
-Indian Palak Paneer
-Brown Rice and Vegetables Bowl
-Teriyaki Bowl
-Thai Stir-Fry
-Asian Noodle Stir-Fry
-Rice Mac & Cheese
-Garden Vegetable Lasagna
-Cheese Enchiladas
-Black Bean and Vegetable Enchiladas
-Rice Crust Cheese Pizza (so good)
And there are many more that I have yet to try. All the ingredients are healthy, wholesome and organic. Yes, they are a bit high in sodium but given that they are low in every other bad substance, what's a little salt? They also pass the "I can read and pronounce all the ingredients" test. They are also reasonably price from $2.50 to $3.99 (the pizza is $6-7). These are the next best thing to homemade.
Life has so many challenges and getting lunch together shouldn't be one of them.
Bengali Spiced Chickpeas, Tomatoes, and Spinach
After a bean filled Mexican food themed week, I decided to go back to my roots last night. I came across this recipe in a book I previously mentioned, Eating for IBS by Heather Van Vorous. This recipe is so tasty and quick, especially if you used frozen spinach.
Makes 4 Servings
Time: 30 minutes if you use fresh spinach, 20 minutes if you use frozen
Ingredients
-1 tbsp olive oil
-1 tsp black mustard seeds
-1/2 tsp asafoetida powder
-1 tbsp mild curry powder
-1/3 tsp ground cumin
-1/4 tsp ground coriander
-1 c chopped onion
-4 large garlic cloves, minced
-10 oz. spinach, drained and chopped fine
-8 oz. can tomato sauce
-19 oz. cooked or canned chickpeas, rinsed and drained, divided
-1 c vegetable stock
-black salt to taste
My suggestions
I used fresh spinach, which I brought to a boil, and the simmered for 5 minutes, and then drained. To save time, you could use frozen spinach that has been appropriately defrosted and chopped finely. I also recommend using a vegetable broth that has a good taste, something you would drink hot if you had a bad flu or cold. Or perhaps water would be fine. The broth I used was ok which I think affect the way I felt about the dish overall which was mediocre. But my cooking partner gave it a great review. I didn't use black salt -- don't know what it is and since I have never seen it called for in other recipes, I decided to skip it.
Preparation
In a large skillet heat the oil over medium heat, add the spices, and cook, stirring until the mustard seeds pop and the spices are fragrant. (I would add the spices first, mustard seeds last so that the mustards don't splatter on you as you add the spices.) Add the onion and garlic, and saute until golden, about 5 minutes. (Not sure if you can tell the onions are golden because they are not covered with the spices which gives the onions a dark brown coating) Add the spinach, tomato sauce, and 1 cup chickpeas. In a blender, puree the remaining chickpeas with the broth. Add the pureed chickpeas to the skillet and simmer, stirring occasionally, until hot. Add black salt to taste and serve with rice.
Don't be turned off by the appearance of this dish, it's good. This is another reason why this dish was mediocre in my eyes. Great food looks as good as it tastes. Or perhaps it's just not as fun to eat what you cook when you cook a lot. I guess I'm waiting for someone to cook for me so that I can write about their cooking process for a change!
Happy Eating!
Monday, April 17, 2006
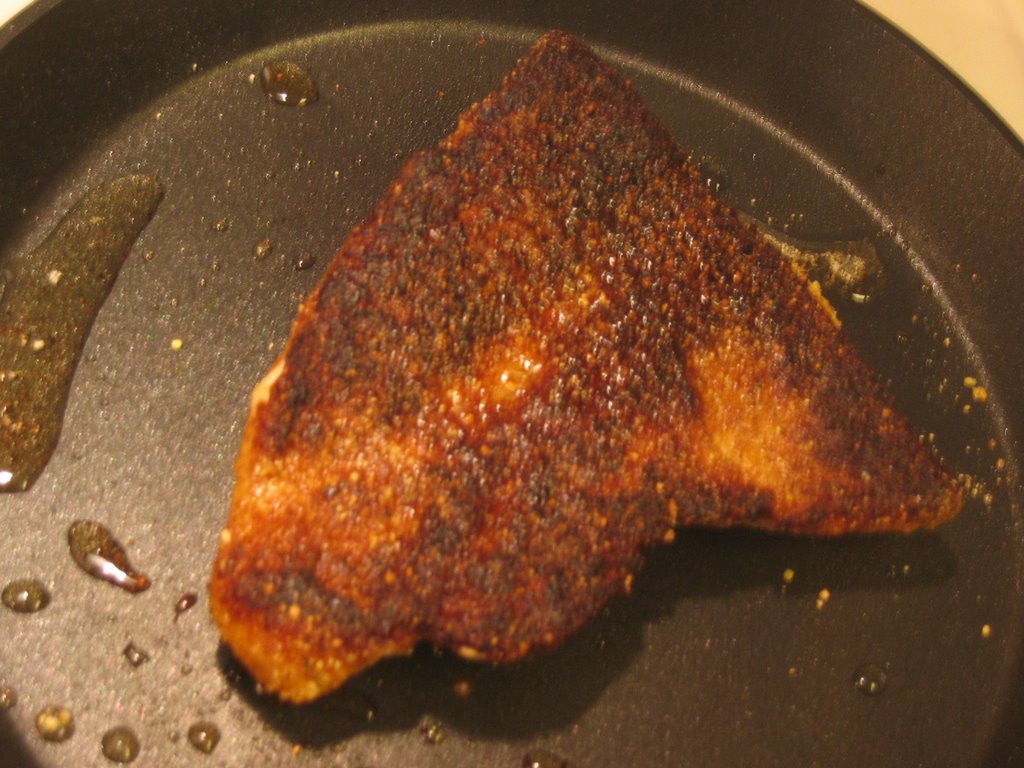
Honey Mustard Fish Failure
I know. It's been 5 days since I've reported anything. I'm not dropping off in the cooking level. Let me tell you, I wanted to cook something new and write about it but the Potato and Kalamata Olive Stew and Kidney Bean and Vegetable Chili lasted us so long that there was no need to cook anything. And if I had, something would have gone to waste and I hate waste. I think I have to make things in smaller quantities so that have the excuse to cook more.
Anyhow, last night I tried a new recipe. I was so excited about this recipe because I love fish when it's crispy on the outside and tender on the inside. It had the added bonus of being a new flavor and way of preparing the fish. Sadly, I have to report my first failure in the last 3 months. I'm a bit miffed that this did not work out partly because of my unblemished cooking record but also because I was not assertive enough in the kitchen. I should have listened to my gut.
I'm going to list the ingredients and preparation, and then tell you where I went wrong.
Makes 4 servings
Time: 35 minutes
Ingredients
- 4 catfish or salmon fillets (5 to 6 ounces each)
-1 1/2 tbsp honey
-1 1/2 tbsp Dijon mustard
-1 to 2 tablespoons fresh lemon juice
-3/4 c fresh bread crumbs or 1/4 c cornmeal
-1/2 tsp dried thyme
-salt and ground black pepper to taste
My modifications
I bought a pound of catfish because there are just two of us and I used cornmeal. I did not halve the sauce amount because we had a little over a pound of catfish (2 fillets together weighed 16+ ounces) which is almost 20 ounces of fish (or what 4 fillets at 5 ounces would be).
Preparation
Preheat oven to 375 degrees.
Rinse fillets and pat dry; set aside. In a bowl, whisk together the honey, mustard, and lemon juice. In a separate bowl, combine bread crumbs or cornmeal with the thyme and a few shakes of salt and pepper. Dip each fillet into the honey-mustard sauce and then dredge it in the bread crumb or cornmeal fixture to coat both sides evenly. Places fillets in a sprayed or lightly oiled baking pan and bake, uncovered, for 20 to 30 minutes, or until thoroughly hot and tender.
So I was a little concerned that the recipe called for 20 minutes of cooking time because I've cooked catfish on the stove for 10-12 minutes total. The preparation itself was simple and easy. The dredging was a little sticky from what I observed of my partner. One fillet nicely coated, nicely sticking to the fillet. The second fillet looked like it might have had too much cornmeal. I surmise that this may have happened because we dredged the fish in the honey mustard sauce by using our hands. The hands get sticky, you touch the cornmeal, and it's a mess. I think next time, it might be worthwhile to use a basting brush to get the sauce on the fish or to wash and dry the hands before coating with cornmeal.
I suggested that we put the fish on the top rack but my cooking partner suggested the last rack so that's what we ended up doing. After 20 minutes, the fish was not crispy. In fact, it still looked wet from the dredging. So we moved it to the stop for another 5 minutes and then another 5 (10 additional minutes total). At this point it still looked 'wet' but we had to take it out for the fear of overcooking.
The flavor was good but the fish was not crispy and slightly over done. And you know how it is when you expect one result and don't get it, it's disappointing. As an aside, that's why it's sometimes good to have low expectations so that you are pleasantly surprised. The next time I make this, I think the fish should be placed on the top rack so that the fish gets crispy on the outside for 10-15 minutes.
The mashed potatoes that went with this dish were creamy and awesome, if I do say so myself.
I really wanted a picture of the fish so that you could see what went wrong but the flash card decided go kaputz on us.
Wednesday, April 12, 2006
Unemployment Cookies aka Sugar Cookies

I call these unemployment cookies because I made these on my first weekend of freedom back in January -- aka I knew that I would not be going to work on Monday and many many days after that which made my first freedom weekend so deliciously happy that I had to celebrate with something sweet. And for those of you that know me, I just adore sweets. I cannot pass them up which is why I had to come up with the homemade rule and now I really can't eat anything but homemade because I notice the difference too much.
I'm not sure who to credit this recipe to because my friend shared it with me via e-mail. It looks like it was forwarded to her by a Linda. So Linda, I solute you and this recipe. It's wonderful! You know how store bought sugar cookies can be too sweet and then the frosting makes it over the top. These cookie are just right. There is the added bonus that you feel like a kid again when decorating the cookies.
So yesterday I decided to make them again but this time they were "Please let the sunshine again/Go A's" cookies (see white cookie in picture with slightly deformed A). They can be whatever you want them to be. It is time consuming to make these and the first time I didn't notice the time because I baked them with a friend but doing them a lone, I noticed the time much more.
Makes 30 cookies more or less depending on thickness of dough, and size of cookie cutter
Time: 3 hours
Ingredients for cookie
-1 c butter, softened and unsalted
-1 c sugar
-1 egg
-1/2 tsp vanilla extract
-2 tsp baking powder
-3 c flour
Preparation
Preheat oven to 400 degrees. Cream butter and sugar. Beat in egg and vanilla. Add baking powder and flour, mixing after each cup. Dough will be very stiff. Blend last flour by hand. Do not chill. Divide dough into 2 balls. On floured surface, roll each ball into 12 inch circle, approximately 1/8 inch thick. Bake on ungreased cookie sheets on top rack of oven, 6 to 12 minutes, depending on thickness or until lightly browned. For me, I found that 8 minutes was the perfect baking time.
Ingredients for Butter Cream Frosting
-2 c powdered sugar (16 oz.)
-1/2 c butter, softened and unsalted
-1/8 tsp salt
-1 tsp almond extract
-3-4 tbsp milk
Preparation
Cream one-third of the sugar with butter and salt in large bowl. Blend almond extract, 2 TGIF milk and remaining sugar into mixture. Gradually stir in remaining milk, until desired spreading consistency is reached. I found that I only needed 2-3 tbsp milk to get the right consistency but I was daring and added 1 more tbsp (3 tbsp total). The consistency was a little 'looser.' If I had to do it again, after the 2nd tbsp, I would add 1 tsp at a time to get to the desired consistency.
Divide into 5 small bowls. Color one bowl with red food coloring, one with blue, one with yellow, one with green and leave one bowl white. Mix well.
I used an electric hand mixer for both the cookie dough and the frosting. I keep my butter in the freezer so I took it out the night before and left it out. I found that doing this made the butter super soft and easy to work with.
Decorate with colored sugars and other decorations. Allow icing to thoroughly dry (overnight) before layering cookies. Cookie sheets are good, with waxed paper loosely laid over the cookies. Place cookies in tight fitting container, if in Arizona. In California, they will be fine on the cookie sheet covered with the waxed paper.
I find that I cannot over eat with these cookies. One is sooo scrumptious and satisfying that is just about all I can eat in a sitting. So imagine how long these will last if you have a small family or live alone! They are well worth the effort.
Kidney Bean and Vegetable Chili

I am not a big fan of kidney beans. This deal was sealed when Mom left us for two weeks when I was in 8th grade and our neighbor, the kind-hearted woman that she is, decided to make us a number of different salads for dinner, one of which was a cracked wheat and kidney bean salad. Of course my sister and I did not know this when we excitedly ran over to pick up the dinner from her home. We were rescued we though. Anything had to be better than what my dad would have come up with. We trooped on over and out of her fridge she pulled out two salads one of which was the aforementioned salad. Cracked wheat is the color of brown rice and combined with the red of the kidney did not make for the most appetizing dish. Aren't they disturbingly maroon? She was so happy to make us these salads because "I know what good eaters you are and you're not picky. I wish my grandchildren would eat like you." My sister and I looked at each other at the corner of our eyes. After we thanked our neighbor and were out of ear shot, we laughed and shook our heads in dismay. Needless to say, my dad was one happy camper that evening.
Anyhow, I have slowly acquired a taste for these beans. I love chili but since I don't eat beef or meat it's sometimes hard to find a hearty vegetarian chili until I found this recipe in Vegetariana by Nava Atlas. I highly recommend you visit her website. She has her own blog and lots of recipes and everything. What a find -- her website and this recipe that is!! It's quick, easy, low maintenance and tasty. Once you put all the ingredients together, you don't even have to watch it. Set the timer and let it do it's thing.
Having a craving for something hearty on a rainy night, but not wanting to make something too time consuming after spending 3 hours making cookies, I decided to give this recipe a whirl last night.
Makes 6 servings
Time: 35 minutes
Ingredients
-2 tbsp olive oil
-1 large onion, chopped
-1 medium zucchini, thinly sliced
-1 cup cooked fresh or thawed frozen corn
-14 ounce can imported plum tomatoes
-1 cup canned crushed or pureed tomatoes
-2 tsp chili powder
-1 tsp ground cumin
-1/2 tsp ground coriander
-1/2 tsp dried oregano
-4 cups cooked or canned pinto or red beans
My modifications
-tbsp olive oil
-14 ounce can diced tomatoes because I couldn't find canned plum tomatoes
-3 cups kidney bean (2 14.5 ounce cans)
-1 tsp chili powder because I use the Indian kind
Preparation
Heat oil in a soup pot. Add onion and saute over medium heat until translucent. Add green pepper (use frozen to reduce chopping time) and saute until it softens and the onion starts turning golden. Add the remaining ingredients and cook on low for 25 minutes, stirring occasionally.
I like to serve this in a bowl with brown rice. The cookbook also recommends couscous or bulgur and tortilla chips. I have also used this chili to make soft tacos. All of it's delicious yet so nutritious. Another reason why I love this recipe -- it's versatile so you can't sick and tired of it! And you'll have lots of leftovers.
Between this dish and the Potatoes and Stewed Kalamata Olive dish, you'll have food for three or four days (for 2 people). You may get sick and tired of eating it which I have but between the two, you can alternate between lunch and dinner.
Happy Eating!
Food Rant of the Week: High Fructose Corn Syrup
What is this stuff, anyway? I see it everything from store bought cookies to hummus to candy bars to stuff you just wouldn't expect to see it in but that's slipping my mind at the moment. Oh like ketchup, jams, and soft drinks!! Did you know that beginning in the late 1990s Americans now consume more HFCS than sugar? Though the process of making HFCS has multiple stages and various chemicals, it's cheaper than sugar too! So I guess it shouldn't be surprising that we see HCFS in processed foods.
HCFS was an invention of the 1970s so did packaged cookies have sugar in them? How is that we went to the real stuff to the fake stuff and that we let it happen?
That HFCS is so unnatural should be no surprise given the the unnaturalness of creating it. The process involves two enzymes that have been genetically modified to withstand higher temperatures before they become unstable. Did you know that 80 percent of corn is genetically modified? So if you're a consumer trying to avoid genetically altered foods, then HFCS is definitely something to avoid.
When I was working, I sometimes traveled which taught me not to take for granted the variety and depth of wholesome food and ingredients that I have access to. Sometimes my travels took me to places rural areas where the local grocery store is a Safeway, Food Max, or an Albertsons at best. I remember once wanting chips and hummus and for the life of me I could not find one hummus that did not have HFCS. Not one. Anyone who knows anything about hummus knows that it does not and should not have HCFS in it and that it should not taste sweet! And if you have, you know that this is why the Athenos brand tastes a little junky. Hummus does not have any added sugar in it except for what naturally occurs in the ingredients. Do a taste test and tell me which one you think is better. Why do these food companies add HCFS to something that shouldn't be sweet to begin with? If you have an answer to this, I would love to hear it.
It's no wonder we're so fat. And it's not surprising that the incidence of diabetes and every other bad disease is increasing. This is a hypothetical but work with me.... I bet if people altered their diets to exclude HCFS, without changing their exercise routine (or lack thereof one), people would be a bit healthier and might lose weight? Hmmmmm. Just a thought.
This is why I have the homemade rule -- I won't eat it unless I know it's homemade or if I can read the ingredients off the box myself so that I can discern the 'badness' myself. If it's homemade it most likely does not have HCFS. Homemade may have a stick or two of butter but isn't that better than hydrogenated oil this or that?
I'm definitely not saying that you should stay at home and spend hours and hours making homemade treats because we're busy people and there just isn't enough time to do that all. But at many grocery stores like Whole Foods and Trader Joes they have lots of packaged cookies and treats that do not contain HCFS or hydrogenated oils. And some are really good. Some aren't as good but for the most part, you can't go wrong. They taste better and are better for you.
Tuesday, April 11, 2006
Potatoes Stewed with Kalamata Olives
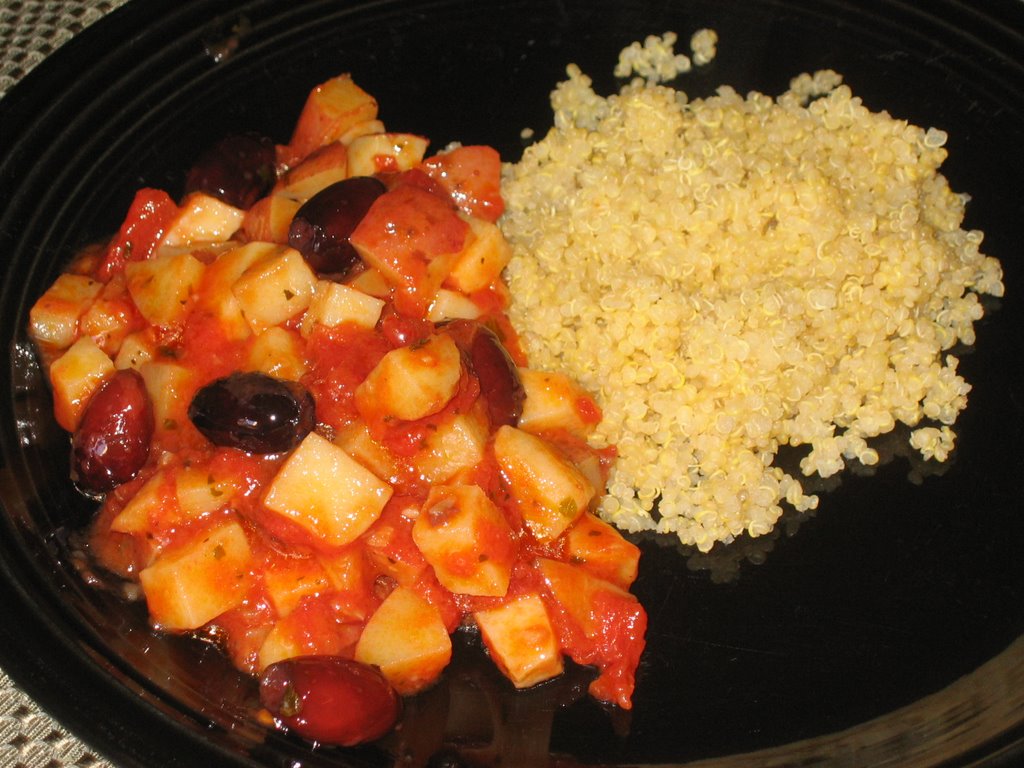
Last year I discovered this recipe when I was searching for a way to use up leftover red potatoes and I didn't want to curry them up Indian style. I wanted to branch out and in searching The Greek Vegetarian I found this delightfully rich and so satisfying. The potatoes give it comfort and richness, while the tomatoes give the dish acidity in a good way.
As you know, I just adore potatoes in all forms. I also love tomatoes and this recipe calls for both plus olives which is an added bonus for me. This recipe is awesome because it calls for only 6 ingredients most of which you probably already have in your kitchen. It does take longer than 30 minutes but it's a very low maintenance dish that does not require a lot of attentiveness. You can let it sit on the stove and do it's thing.
Makes 4 servings
Cooking time: 50 minutes
Ingredients
-2 1/2 pounds medium sized potatoes
-1/3 c olive oil
-2 garlic cloves, finely chopped
-1 1/2 cups rinsed and pitted kalamata olives (not chopped)
-1 1/3 cups of plum tomatoes with their juices
-1 tsp dried oregano
-Salt and pepper to taste
My modifications
-Slightly less than 2 lbs of potatoes and I use red potatoes
-1/4 c olive oil
-1.5 cans (or about 22 ounces) of diced tomatoes (salted)
-1 c kalamata olives
-I don't add salt because I find the salt from the tomatoes and olives is enough
When I made this the first time, I followed the recipe exactly and found that the ratio of potatoes to tomatoes was wrong. Too many potatoes and not enough tomatoes and juices in which to cook the potatoes. I had to add water to prevent burning and I really don't like doing that because the food loses its flavor that way. 1/3 c olive oil does seem like a lot, no? I reduced it to 1/4 c. You do need this much though because the dish gets some of its flavor from the oil.
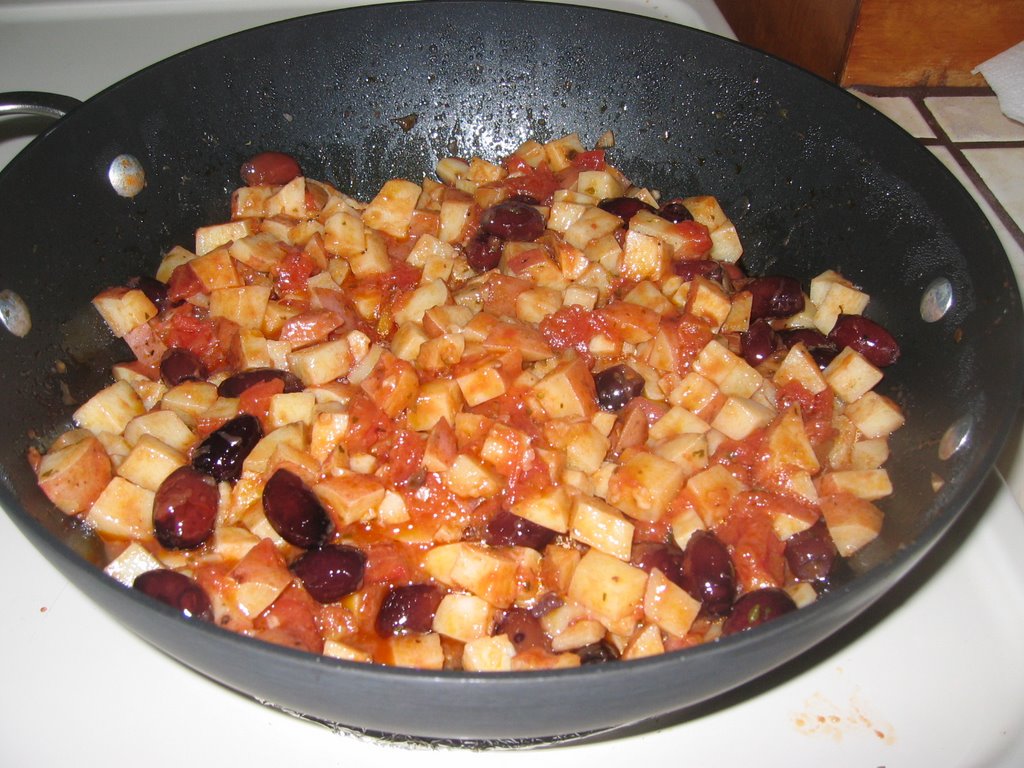
Preparation
1. Wash and peel potatoes. Cut them in half lengthwise and cut each half into 3 or 4 slices, each about 1/2 inch thick (I cut them smaller). I don't bother with the peeling because I think it's such a waste of time and as my mom says, "All those nutrients are in the skin and why would you want to lose those?!"
2. In a stewing pot or Dutch oven (I used a my favorite non-stick skillet), heat the olive oil over medium-high heat. Add potatoes and stir to coat. Toss in garlic and stir. Add the olives and toss everything for 2 to 3 minutes. The olives will break apart a little and dish will change color and darken. Add the tomatoes and stir. Lower the heat, cover pot, and simmer the potatoes for 30 minutes, until the potatoes are very tender and the sauce is thick. (I found that this took 40 minutes). Add a little water during cooking if it seems as though the potatoes are going to burn (don't do this....Add more tomatoes in the beginning). Just before removing from heat, add the oregano and season to taste.
After 40 minutes, I added the oregano. I turned the heat off and left covered so that the dish could continue to cook in it's own heat.
3. Serve with good bread and feta on the side. I like to eat this dish with quinoa, a wonderful tasty grain that you can cook on the stove while preparing this dish or in a rice cooker.
This dish is so darn tasty. I made it last night for dinner -- it's Greek comfort food.
Happy eating!
Monday, April 10, 2006
Brown Rice
I used to be intimidated by brown rice. I just didn't know anything about it except that I was supposed to eat it for all of it's nutritional value. I only grew up eating basmati and jasmine rice. And from a young age, I knew how to prepare it in the rice cooker. I love rice cookers because they are so low maintenance and you're not tied to the home because they turn off automatically. But I'm not sure about cooking brown rice in a cooker? Anyway, with my time, I learned about a full proof stove top method that I of course learned from the Moosewood Collective cookbooks.
Cooking time: 25-3o minutes
Ingredients
-1 c uncooked brown rice (yields approximately 3 cups of rice)
-1 tbsp butter
-2 1/4 c water
-3/4 tsp salt
Preparation
I love this method because it's full proof and you are guaranteed perfect results. No peeking, ok?
-In a non-stick skillet, saute rice in the butter until grains are coated.
-Add water and salt, cover, and bring a boil. When you see steam escaping from the lid, you know the water is boiling.
-Turn off heat for 5 minutes. Leave skillet on burner.
-Turn heat back on low to simmer and cook for 25-30 minutes.
Let me tell you.... it is so so tempting to peek to see what's going on inside the skillet. Resist the temptation. Occupy yourself in whatever way you want but whatever you do do not uncover the skillet because you will lose the steam in which to cook the rice. And then this method falls apart. If you don't peek you will have perfect results I promise.
Sunday, April 09, 2006
Tomato-Basil Risotto
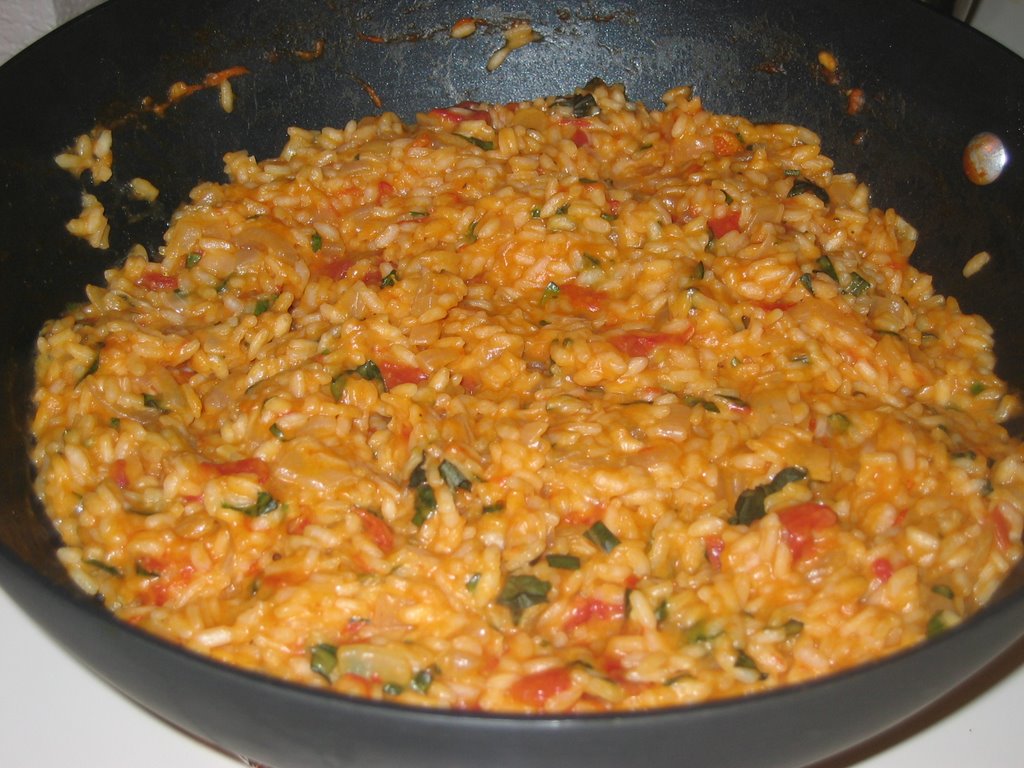 My inspiration for this recipe came from a friend's wiki and after reading it, it was all I could think about making for the next week. So you can only imagine my disappointment when I discovered that there was no basil at the grocery store. I was horrified and in a state of disbelief? How can a grocery store not have fresh basil?
Risotto is not at all hard to make but it does require time, patience, and strong arms. I think people get fed up because you have to constantly stir but I think it is so worth it for the creamy rich results you get in the end. I made risotto for the first time about a month ago (onion feta). The cookbook I used said that I would need 4 cups of broth but in the end I probably used 61/2 cups. I personally like the suggestion that Deborah Madison makes in her Vegetarian Cooking for Everyone. She suggests a range of 51/2 to 61/2 cups.
I winged this recipe. I was going to use a recipe that a friend had posted on his wiki but alas the wiki was down last night but is now working as I write this entry of course! So from memory and the help of another similar recipe from Easy Vegetarian, I came up with the following:
Makes 4 servings
Cooking time: 45 minutes
Ingredients
-2 tbsp butter
-1 c onion, chopped finely
-2 cloves garlic, minced finely
-4-5 cups vegetarian broth
-1 can (14.5 oz) diced tomatoes, unsalted
-1/3 cup grated Parmesan
-1/2 cup fresh basil, finely chopped
-black pepper to taste
Basic Preparation for any Risotto Dish
1. Simmer stock on stove.
2. Melt butter in a wide non-stick wide skillet so that that the broth can cook quickly. A tall narrow pan will not work.
3. Add onion and cook until softened, but not brown on medium heat. Onions create the base flavor.
4. Add rice to skillet. Stir until grains are coated with butter.
6. Begin adding stock. You want the heat to be high enough such that the liquid absorbs in 2-3 minutes. Start by adding 1 cup of broth and follow-up with 1/2 cup increments with constant stirring.
Preparation for Tomato-Basil Risotto
In large non-stick wide skillet, melt butter and saute onions until softened. Add garlic, mix well. Add arborio rice. Stir until grains are thoroughly coated with butter. Add 1 cup of simmering broth, stirring until it has been absorbed. Repeat with 1/2 cup increments. After 10 minutes, add diced tomatoes. Because the diced tomatoes are juicy, it will take longer than 3 minutes to get all the liquid absorbed. At this point, I would do a little taste test to see how the rice is doing. For me it was still nutty and chalky. Continue to add simmering broth in 1/2 cup increments for another 8-10 minutes, until rice are tender but firm.
Add 1/2 cups broth, Parmesan, basil, pepper. Mix well, remove from heat, cover, and let rest for 2 minutes.
Spoon into bowls, sprinkle with grated Parmesan, and serve right away.
I was so excited about this I almost didn't take pictures.
Wednesday, April 05, 2006
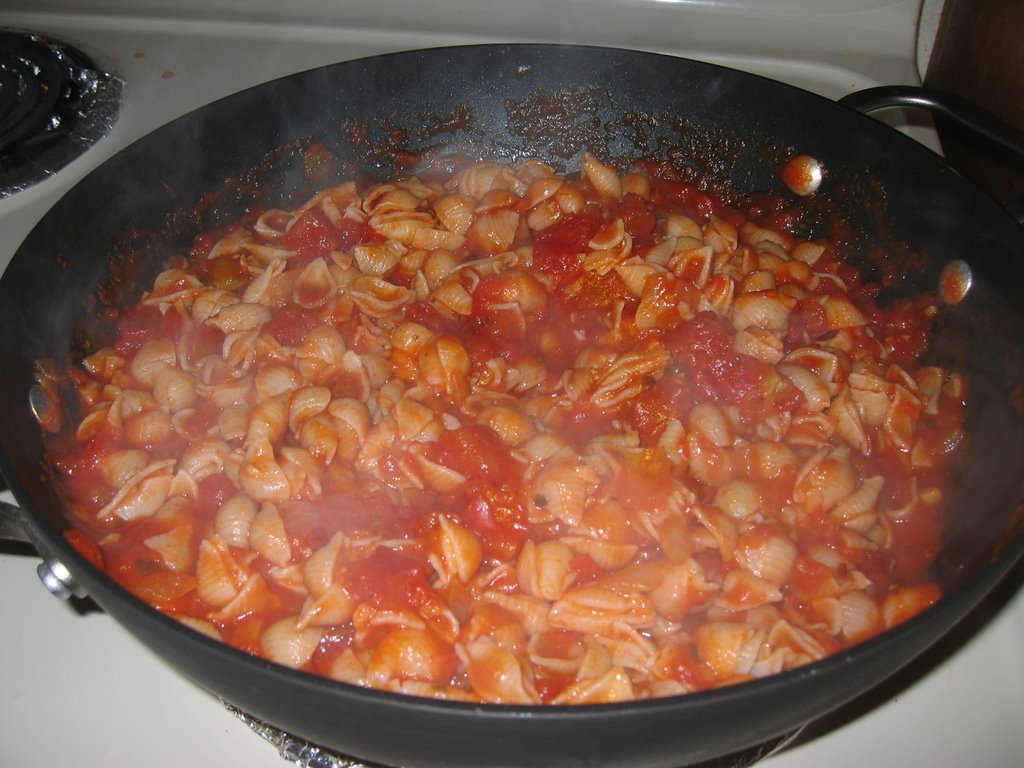
Pasta with a twist
I know, I know. Pasta can be so freaking boring and so a reminder of the bygone college and post-college days as the dish one made because they didn't have anything else to make or lacked imagination to do something creative or didn't have time.
I partly blame the ugh factor to companies like Ragu and Prego. The ingredients they list are fine but I think because their first ingredient is tomato puree rather than crushed tomatoes is the reason why the ugh factor has crept in. Also, I think these companies try too hard -- they put in too many herbs and a bit of this and that, and it really just spoils it altogether. But I have discovered pasta need not be this way.
I was tooling around cakerecipe.com and searched "penne bake." I found a recipe that was my inspiration, modified and made my own. I really adore this recipe because it is so simple and can be made into two similar but different dishes (notice a theme).
I also love this dish because I add some kick to it with the addition of 1/4 to 1/2 tsp red chili pepper flakes. Red chili pepper flakes and tomatoes are like peas in a pod -- they are meant to be together. Personally, I think pasta sauce in general can be blagh and bland but the addition of the flakes gives it a nice little kick that rounds out the flavor. It's not overwhelming at all but your mouth and taste buds will thank you.
Instead of using the typical Ragu or Prego, I use the Pomi brand marinara sauce whose first ingredient is crushed tomatoes, not tomato puree. Pomi is the next best thing to fresh tomato marinara and is certainly the best marinara coming out of a box or can. It is a product of Italy and not much more expensive then a Ragu or Prego. I think this along with a can of diced tomatoes is so much nicer than anything you can get out a bottle.
Makes 6 servings
Cooking time: 20 minutes for simple pasta, 45 minutes for baked pasta
Ingredients
-12 ounces of your favorite pasta
-1 cup finely chopped onions
-1 tbsp olive oil
-1 can (14.5 ounces) diced tomatoes (salted)
-1 Pomi marinara sauce (26.5 ounces)
-1/4 tsp red chili pepper flakes
-2 cloves of garlic finely minced
-1 cup part-skim mozzarella
Preparation
Cook pasta and drain. In large pan, heat oil on medium heat. Add onions, garlic, and chili pepper flakes. Saute until onions are translucent, about five minutes. This is the base layer and it's really important that the onions and garlic cook so that the flavors shine through. To this, you could potentially add mushrooms or whatever else you want. Add diced tomatoes and Pomi marinara. Cover, and heat through for 10 minutes. I think it is really important to take the time to heat the sauce to let the flavors pop.
If you don't have a lot of time, stop here and toss the pasta, the sauce, and cheese together. Some people prefer to sprinkle the cheese on top. You choose. Serve. This is simply delicious and takes 20 minutes.
If you have more time, preheat oven to 350 degrees. Toss sauce with sauce and place into 9x13 inch baking dish. Sprinkle top with mozzarella. Bake in preheated oven for 20 minutes or until cheese melts.
The first time I made this recipe, I used penne and I baked it because there is nothing like biting into penne with the cheese oozing out of it. For more of an ooze, you may need to add 2 cups (total) mozzarella. The inspiration recipe calls for it but because I am fat conscious, I cut it in half to one cup. Being the anxious cook that I am, I repeatedly opened the oven to make sure the pasta wasn't drying out so I missed on the baked crispy effect. Nevertheless, it was deliciosa. The first time I made this, I used three-quarters of the Pomi Marinara but I recommend dumping the whole container so that the pasta does not dry out.
Tonight, I used little shells and I didn't bake it. I stopped after preparing the sauce and tossed with the sauce. Then I served in bowls topped with a little shredded parm. Also, terrific.
As a friend of mine used to say, "I don't like that Raghu spaghetti sauce you're dating." I took her advice and pass it on to you. Dump the Ragu.
This recipe is dedicated to my friend Lauree, with love.
Bon Ap!
Monday, April 03, 2006
Black Bean and Rice Soft Tacos or Enchiladas


I love Mexican food and am always on the quest for good enchilada recipes. Actually, I'm not sure what I love more .... The food itself or the fact that I adore sour cream and having it with Mexican food. There's nothing quite like a dollop of sour cream.
Any how, I've tried a few recipes here and there but nothing that wowed me until I found this recipe. This recipe is great because it's relatively fast, easy, and can be made into two similar but different dishes. If you only have 30 minutes or less or are just plain pooped, you can use the filling for soft tacos or tostadas. If you have 55 minutes, you use the filling to make enchiladas. This recipe makes a lot for just 1 or 2 people so think leftovers for just 30 minutes of effort!
Makes 8 servings
Cooking time: 30 minutes for soft tacos or tostadas, 55 minutes for enchiladas
Ingredients
-1 green pepper (3/4 c), chopped
-1 medium onion (1 c), chopped
-3 garlic cloves, minced
-1 tbsp olive oil
-1 can (15 oz) black beans, rinsed and drained
-1 can (14 1/4 oz) diced tomatoes with green chilies
-1/4 cup picante sauce
-1 tbsp chili powder
-1 tsp ground cumin
-1/4 tsp crushed red pepper flakes
-2 cups cooked brown rice
-8 flour tortillas, warmed
-1 cup salsa
-1 cup reduced-fat shredded cheddar cheese
-3 tbsp chopped fresh cilantro
My modifications and suggestions
-1 can diced tomatoes, no green chilis
-3/4 c frozen peppers
-No cheese
-No cilantro
-Corn tortillas
-3/4 cup uncooked brown rice = about 2 & a bit cups cooked brown rice
-If you're using Indian chili powder, halve the amount
I actually really like fresh cilantro but as you know you have to buy a huge bunch for 3 measly tbsp and it ends up going to waste. I abhor waste. Why can't we buy what we need? I also recommend using 3/4 cup frozen green peppers or mixed color green peppers if you want to reduce chopping time. Don't bother defrosting, they work just fine. And if you can, make the rice in advance. If you have a rice cooker, it will automatically turn off so you can prepare it the night before or in the morning before you head out to work.
Preparation
In a large nonstick skillet, saute the green pepper, onion and garlic in oil until tender. Add the beans, tomatoes, picante sauce, chili powder, cumin and red pepper flakes; bring to a boil. Reduce heat; simmer, uncovered, until heated through and mixture thickens. Add rice; cook 5 minutes longer or until heated through.
If you don't have any more time, stop here. Heat up a few tortillas or tostadas and stuff them with this filling or eat as is. Serve with a bit a lettuce, guacamole, and/or any of your favorite Mexican condiments. This evening, this is where I stopped, but if you have time or are craving enchiladas, then continue below.
Spoon a rounded 1/2 cup down the center of each tortilla. Fold sides over filling and roll up. Place in a 13x9x2 inch baking dish coated with nonstick cooking spray. Spoon salsa over each tortilla. Cover and bake at 350 for 25 minutes. Uncover; sprinkle with cheese and cilantro. Bake 2-3 minutes longer or until cheese is melted.
The first time I made this recipe, I made the enchiladas. I found that the 1 cup salsa was not enough to cover the all the stuffed tortillas, and they came out a bit dry. The dry factor was probably not helped by the use of corn tortillas and they also tend to fall apart a bit because of their delicate nature. I didn't use cheese and didn't find them to be lacking in taste whatsoever.
The next time I make this in the enchiladas form, I will still use corn tortillas because I like their flavor but instead of covering them with salsa, I would use a can of (red) enchilada sauce instead. I have previously made enchiladas with corn tortillas. They were nice and moist if completely covered in the sauce.
Happy eating!
Sunday, April 02, 2006
Pan Fried Cornmeal-Crusted Cajun Catfish

Last year, I got sick and tired of eating salmon. I ate it broiled, baked, and got fed up. A friend was once again perusing his Eating for IBS: 175 Delicious, Nutritious, Low-Fat, Low-Residue Recipes to Stabilize the Touchiest Tummy, and came across this recipe. It only has 3 ingredients and is so tasty.
I love fish dishes because it is easy to prepare and cooks so quickly that you can have a nice meal in no time at all.
The first couple of times that I made this, the fish tasted great but I could not for the life of me get it to be crispy on the outside but at Thanksgiving 2005, I broke through and will share those tips with you.
Since I hadn't made the dish since Thanksgiving and I had the craving, I made it last night for dinner.
Makes 4 servings
Cooking time: 30 minutes (including a steamed veggie)
Ingredients
-1.5 lb. catfish fillets
-1/3 cup cornmeal
-2 teaspoons Cajun seasoning (or substitute Old Bay seasoning), or to taste
My modifications
-1 lb. catfish fillets (serves 3)
Combine Cajun seasoning and cornmeal in a large pie plate. Coat the fish on all sides with the cornmeal mixture, being sure to shake of the excess. Heat a large non-stick skillet over medium heat, spray pan with cooking oil, and cook catfish until golden brown and crispy on both sides and cooked through.
My suggestions
-I do not have a large non-stick skillet. I have a medium sized skillet so I cut the fish in half. As fish is such, one half tends to be thick and the other half (the tail part) tends to be thinner so cooking times will vary. And even if I did have a large skillet, I would still cut the fish in half because the cooking time will vary because the fish is not uniform and you don't want to overcook your fish.
-Place 1 tsp olive oil (for each half) on the skillet and with a spatula, spread it across the pan.
-Make sure pan is hot and oil is heated before placing fish on pan.
-Place fish flat side down first and leave on for 5-6 minutes (for thick piece) and 4 minutes (for thin piece).
-Flip fish over and cook for another 4-5 minutes for (thick piece) and 2 minutes (for thin piece).
I personally like the fish to be blackened as opposed to golden brown because that's when the outside gets really nice a crispy. It looks black and burned but the taste is not affected! Don't worry if you do burn it a bit because even then the fish will not be affected, only the crispy outer part will taste a bit burned.
When I first made this dish, I could not get it to be crispy and that was because I was the impatient and slightly anxious cook. I would continuously poke, prod, and try to see what was going on the side that was against the pan, which would invariably prevent any sort of crispy-ness from occurring. Leave the fish alone and you will have perfect results.
Because it was Saturday and I had time, I served the fish with mashed potatoes and green beans tossed with olive oil, lemon juice, and oregano. If I were working, I would skip the mashed potatoes and serve it with your favorite steamed veggie. Here's a meal that can be made in 30 minutes or less, especially if you have a large non-stick pan!
Eat and enjoy!
Saturday, April 01, 2006
Blueberry-Brown Sugar Scottish Oatmeal
So about two weeks ago, I was perusing Eating for IBS: 175 Delicious, Nutritious, Low-Fat, Low-Residue Recipes to Stabilize the Touchiest Tummy by Heather Van Vorous when I came across a breakfast recipe that I absolutely had to try. I am a person that is constantly hungry. I will eat a meal and about 30 to 45 minutes later I will start to feel a little bit of hunger again. This is particularly true of breakfast foods for me. If I eat cereal, I'm a goner in an hour. I can feel my sugar spike and my energy plummets quickly. And believe me when I say I've tried tons of different cereals. They don't work for me. Eggs are great but who has time in the morning? So I am always on the quest for the breakfast that will hold me over until lunch but that's also quick and easy.
You must be thinking, "Oatmeal? Ugh!" Oatmeal, if not prepared correctly, can be mushy and just plain gross. Who in there childhood has not had a bad experience with oatmeal? Growing up, the only way I liked it was the Mom way. She had the magic touch that made oatmeal darn good. She cooked it until just tender but not mushy and it was great! The Dad way was so totally unappealing we couldn't even sneak bits to Pepper, our dog, who turned his nose away. Even dogs have discriminating tastes.
When I first read this recipe I laughed out loud because it only calls for one teaspoon brown sugar yet it's called Blueberry-Brown Sugar Scottish Oatmeal. I was attracted to this because I love oatmeal, blueberries, and brown sugar. It has the added bonus of being so ridiculously easy you could make it in your sleep and it's ready in 5 quick minutes or less. Because of the minimal ingredients, it's also a breakfast that could be made at work if you have a microwave and refrigerator!
Anyway, I gave this recipe a whirl around noon today.
Makes 1 serving
Cooking time: 3-5 minutes max.
Ingredients
-1/2 cup rolled oatmeal (not instant)
-1 cup of vanilla soy or rice milk
-1 tsp brown sugar
-1/4 cup fresh or unthawed frozen whole blueberries
My modifications
-3/4 to 1 cup 1% milk
-Brown sugar to taste
-FYI, I used frozen blueberries.
Combine ingredients in a microwave-safe bowl big enough to prevent boil-over, and stir well. Microwave on high for 2 minutes and stir. Microwave another 1-2 minutes until berries burst and oatmeal is thickened.
I used more than 1 tsp brown sugar because I like my oatmeal to be a bit sweeter and since I'm not a fan of soy milk, I used milk. Because microwaves vary in their heating capability you should watch. When you see the milk starting to rise and boil, take it out and give it a little taste to see if the oatmeal is tender so that you avoid the dreaded mushy stage. In my case, that's about 1.5 minutes (that's after the initial nuking of 2 minutes).
So I have to say that when I took the oatmeal out of the microwave (after the 2nd nuke), I was horrified, which is why I have not included a picture of this dish. It looked horrendous and gross. A picture would have turned repulsed you in such a huge way and taken away from what is an otherwise tasty, nutritious, and quick breakfast. The blueberries burst releasing its purple color making the oatmeal -- think Grimace of McDonald's. Don't be frightened -- it's really great and when one of those burst blueberries reaches your mouth, it's a little piece of fruity heaven.
Few, if any, breakfast foods hold me over. But this one did for about 3.5 hours when I started to get the nibbles. It's a keeper.
Eat and enjoy!
Subscribe to:
Posts (Atom)


